Tuesday, June 19, 2018
Friday, June 10, 2016
Scrap Your Scraps June Blog/Video Hop!!
Hello Everyone!!
I am very excited to participate in the Scrap Your Scraps June Blog/Video Hop hosted by Tori Bissell. (Link to her Channel)
https://www.youtube.com/channel/UCvH4XikIvtfM63BxkL6togw

For my layout today I am scrapping a Black and White photo of my daughter and her uncle's dog "Baxter". I pulled out several scraps of paper from my scrapbox and I am also using my Fiskars Large Hexagon Punch to cut out some shapes!

I then take the Hexagons and cut the pieces in half and match them on top of another Hexagon just giving each shape more color and character. I glue them together using Glossy Accents that I have added into a fine tip applicator bottle. I decided to arrange the shapes around my page where I felt they looked nice and gave a good flow to the page, laying a few of them in clusters as well as allowing some to fall of the edge of the page.

Before I adhere them down, I am going to take my Faber-Castell Gel Sticks and add them to a piece of plastic packaging with some water and do the "Smooshing or Packaging" Technique in the areas where the Hexagons will be placed giving a watercolor effect to my background.

I add several layers of Scraps behind my photo, some are the papers that I have used to punch out my Hexagons and a couple of other papers are from my Scraps. I layered them offset creating a "Wonky" look, showing a small bit of each pattern paper and none of them quite line up.

Before I stick my photo down I decide to take some foam leaf stickers that I purchased on clearance from Walmart a couple of years ago, I find this to be a very frugal way of adding dimension to my layout as well as creating a bit of a shadow on the page, this also allows me to stick embellishments easily behind my photo.

From my stash I pull out a couple of diecuts from the Amy Tangerine "Bits" Collection pack as well as some stickers from the "Jot" brand from The Dollar Tree. For my Title the word "Cute" comes from the Crate Paper "Wonder" collection. I also used some of the "Studio G" alphabet letters to finish off my Title. I added a Bow Embellishment from the "Jot" brand as well.

To finish off my Layout I add some Paint Splatters from my Homemade Ink Sprays!!


Here you will find a Link to my YouTube Channel where the Full Process Video can be seen! Thank you so Much and I am very thankful to have had the opportunity to join in on this Blog/Video Hop and I hope you will Check out my Channel, Like and Subscribe!! :)
https://www.youtube.com/channel/UCHHUgyXLx5T1H5qq1V8fLxA
Saturday, November 28, 2015
My letter is: S
Congratulations Ang!!!
A fellow crafter and design team member for The OddBallArtCo. just gave birth to a baby boy!
His name is Logan and to celebrate this joyous moment, the members of The OddBallArtCo. Design Team have come together to create pieces in his honor using an image that the very talented Lizzy Love designed for this event.
Below are the instructions and steps I have taken to create a card using the image.
First I colored the adorable image using various colored pencils, in the image below, it shows the colors as Blue and Grey, I colored the image in a couple of different color combinations to see which ones I liked the best, in the remaining photos you will notice I went with the Green and Yellow!
 Next, I cut out the image just using a pair of scissors, I cut around the image roughly leaving a bit of a white border around all the cute animals hanging on the line, I cut out Logan's name in the cloud as well but left the sentiment for another technique.
 I cut out the Sentiment using my Cuddlebug and a Die from Darice Essentials, using the third from the smallest size to cut it out!

I then chose a couple of various pieces of Cardstock, included is a Green Cardstock as my base, a Shiny Yellow and then another Green Cardstock with Glittered Alphabet Letters!
 I then added Pop Dots to the back of the Sentiment, so when I add it to my card it will have some Dimension and stick out from the other images.
 Next, I adhered all of the images together and added the cloud image with the name Logan, and then I chose several Green Sequins and added them to the card with Tacky Glue.
 This is the final result of my card that I created for Crafting Ang and this wonderful Event.

Thank you so much for stopping by my blog, You can follow this link to Lizzy Love's Etsy store where you will be able to purchase this Adorable Image for Yourself!!
https://www.etsy.com/listing/258213735/instant-download-includes-sentiments
You can now go on to the next blog in this Hop to see what the next person has created for this event.
Here is the link to Monikas blog: https://l.facebook.com/l.php?u=http%3A%2F%2Fthecraftofmimi.blogspot.co.uk%2F&h=PAQGn7baH
Congratulations Ang!!!
A fellow crafter and design team member for The OddBallArtCo. just gave birth to a baby boy!
His name is Logan and to celebrate this joyous moment, the members of The OddBallArtCo. Design Team have come together to create pieces in his honor using an image that the very talented Lizzy Love designed for this event.
Below are the instructions and steps I have taken to create a card using the image.
First I colored the adorable image using various colored pencils, in the image below, it shows the colors as Blue and Grey, I colored the image in a couple of different color combinations to see which ones I liked the best, in the remaining photos you will notice I went with the Green and Yellow!


Thank you so much for stopping by my blog, You can follow this link to Lizzy Love's Etsy store where you will be able to purchase this Adorable Image for Yourself!!
https://www.etsy.com/listing/258213735/instant-download-includes-sentiments
You can now go on to the next blog in this Hop to see what the next person has created for this event.
Here is the link to Monikas blog: https://l.facebook.com/l.php?u=http%3A%2F%2Fthecraftofmimi.blogspot.co.uk%2F&h=PAQGn7baH
Monday, September 14, 2015
Guess What??
I am one of the newest member of the Design Team for
Oddball Art Co.


The steps I took to create this Beautiful Project was:
First I Printed off the Image from OddballArtCo. on Etsy,https://www.etsy.com/uk/shop/OddballArtCo
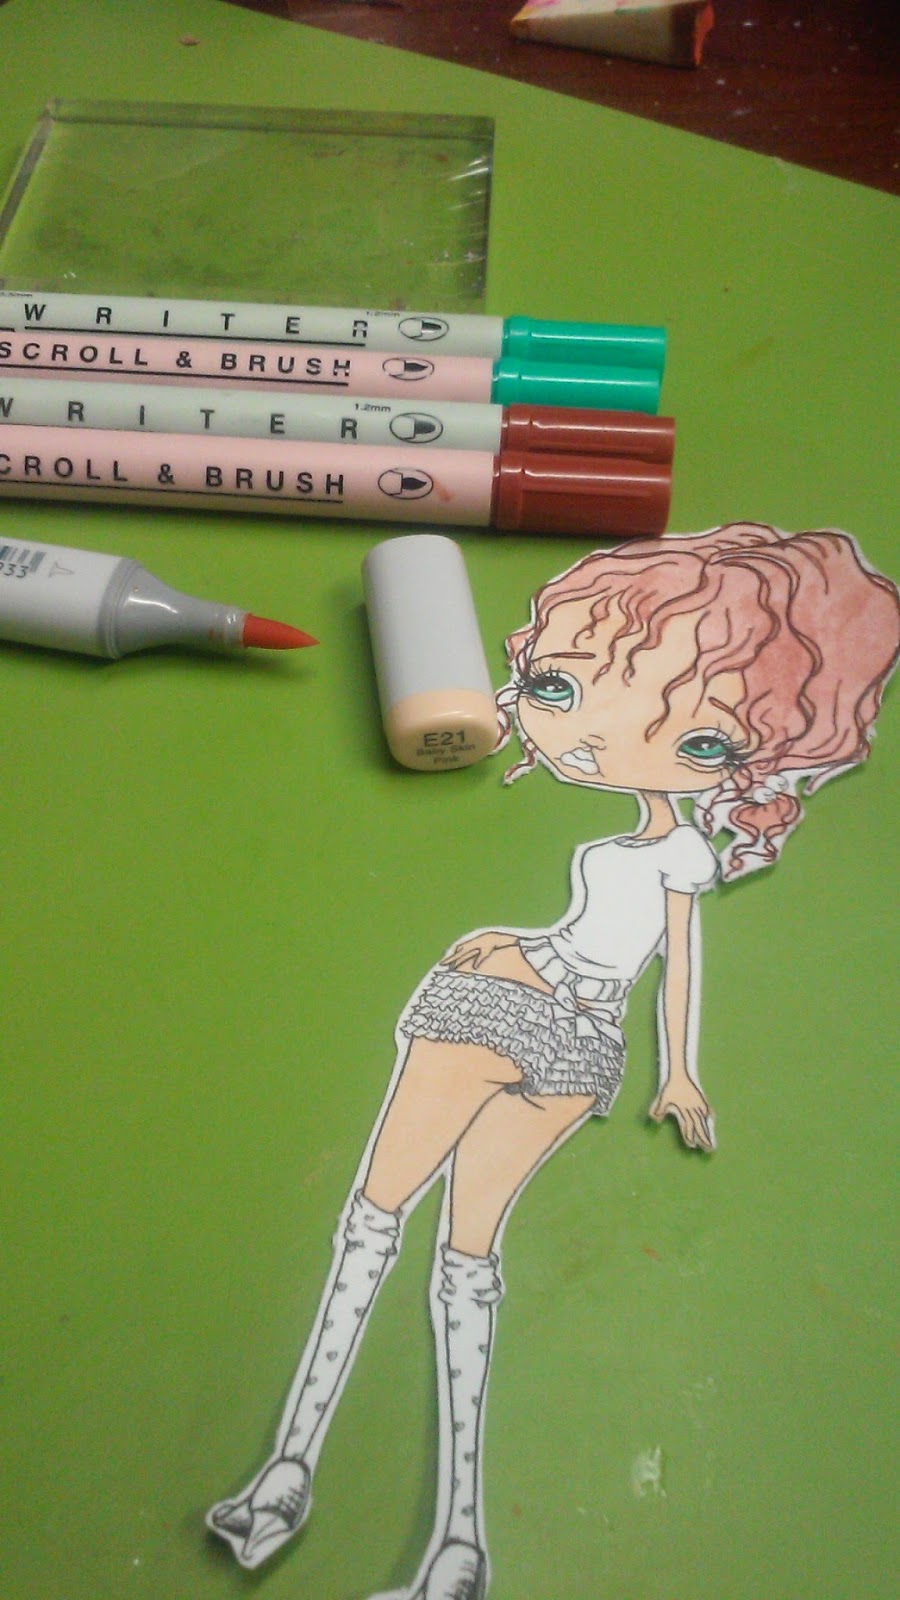
then I used an Exacto Knife to cut out this Gorgeous detailed image!


I use the Zig Marker that has the tips for "Writer" the smaller tip, I outline the outer part of the image I am wanting to color along with any lines that are distinguishing the image, so first I used the Brown to outline her hair and all the details inside to showcase the strands, then using a Clear Stamping Block I take the marker with the "Brush and Scroll" tips and using the Brush tip I scribble a little ink onto the Stamping Block, add a small amount of water and then using a small tip Paint Brush I dip my brush into the water and the ink and then I paint in the image of her hair. It has created a Beautiful look! This technique is my favorite way to color images. I used the Teal colored marker to fill in her eyes! I used my one and only Copic Marker which is the E21 Baby Skin Pink to color her skin!
I used the same technique to finish coloring in my image, using the colors Pink and Yellow!


I am one of the newest member of the Design Team for
Oddball Art Co.

For my first project I chose to use Image No. 216 Richelle!! I loved the image and the sentiments that
were included with her!!
I decided to Alter a 5" X 7" Canvas focusing on the Big Eyed Beauty!

First I Printed off the Image from OddballArtCo. on Etsy,https://www.etsy.com/uk/shop/OddballArtCo
then I used an Exacto Knife to cut out this Gorgeous detailed image!

Second I used my Zig Markers to color in my image. I wanted to achieve the look of Watercolor or the look that people are able to get when they are using Copic Markers. I do not currently own Copic Markers so the steps I take to achieve that look are:
I used the same technique to finish coloring in my image, using the colors Pink and Yellow!

Including one of the sentiments that came with the image that reads:
"dear self today i feel Beautiful"
The Third Step I took was to paint a 5" X 7" pre-gessoed canvas using the color "Pink Eraser" by Apple Barrel!

I then used a Stencil from the Tim Holtz Collection called "Rays"-THS003 and the paint color "Bright Yellow" by Apple Barrel and a Stippling Brush to add some color and texture to the background.

I wanted even more texture on the background so I used another stencil from the Tim Holtz Collection and some High Density Modeling Paste from Studio Acrylics and applied the paste with a palette knife!

After I added the paste I decided I wanted to change the color of the Modeling Paste, I wish I had come to this decision before I applied the paste (it would have saved me some time) if I had just added the paint to the Modeling Paste before adding it to the Canvas, but I didn't so my next step was to take the color "Turquoise" from Apple Barrel and fine tip paintbrush to color in all the "dots" I had created with the paste!

After my background was complete and dry I added my image with pieces of Foam to have the image pop away from the page, focusing on Richelle and the Sentiment!
I then took some White Flowers I had that came from a Lei I had purchased at Dollar Tree and using the "Turquoise and Bright Yellow Paint" that I had used on the background I painted the flowers so they would match. I painted Four of them so I could stack them onto one another creating a Beautiful Flower Piece in the top corner of the canvas!

I wanted to have a center for my flower so I took a Pink Resin Heart I had in my stash and used the "Pink Eraser" paint that I had used on my background and painted the Heart to match my canvas as well!

I added the Flowers and the Heart to complete my Canvas!!

I am so very Happy and Excited to be a part of the Oddball Art Co. Design Team and I hope you will check back with me often to see the projects I produce using the Beautiful Images that are created by Lizzy Love!
If you use the code DTLOLA10 at checkout you will receive 10% off of your purchase at OddballArtCo.
https://www.etsy.com/uk/shop/OddballArtCo
I hope you will stop by my YouTube Channel as well to see this process on Video, as well as other projects I have completed in the past!
https://www.youtube.com/channel/UCHHUgyXLx5T1H5qq1V8fLxA
Saturday, May 16, 2015
Positive Affirmations!!
Hello Lovelies!!
Today I wanted to share a Postcard that I created with the theme "Positive Affirmations" for one of my crafty friends, Kendra O. This swap takes place on Jenniebellie's Website, You can find it here:
http://journalworkshops.ning.com/
This was the first swap I joined from this Website and the group of followers but luckily I did get partnered to Kendra, whom I have swapped with before on a different Art Group. I was really excited to create something that was so true and positive and so I choose the affirmation "Happiness is an Inside Job", to me that is something people should try to remember everyday! I want to remember everyday!
I wasn't sure what I was doing when I started making this postcard but I knew I wanted to write the Affirmation in my own handwriting, which I completed! Check out my video to see the outcome and the process I went through to get there!
http://youtu.be/COe7Kh3sI68
Tuesday, May 12, 2015
Black and Purple Pocket Letter!!
Hey there Lovelies!!
I was approached by a Crafty Friend who wanted to do a Private Pocket Letter Swap, I got really excited because that meant someone WANTED my art and it wasn't just a random swap partner! EEKKK!
So i found out her favorites and she liked Black, White and Deep Purple! I was immediately inspired and knew I wanted my background strickly Black and White with Purple accents! I went straight to work on it and put my heart into it! My Friend has received her Pocket Letter and she has expressed that she loved it, so now I will share it with all of you!! Enjoy!!

Saturday, May 9, 2015
Happy Mail!!
Hey Lovelies!!
I have received some Happy Mail that I shared on my YouTube Channel, if you dont know what Happy Mail is, it is mail that we receive from other people, usually containing works of art created by the other person, a few scraps of pretty papers for us to use in our own creations or anything artsy/craftsy! Alot of crafters decorate the outsides of the envelopes/packages and in turn we are all geniuinely Happy to receive this mail! The Happy Mail I show in my video is from some Swaps I have joined over the last few weeks and these were the pieces that people created for me.
I love doing these swaps, they are alot of fun, they inspire me to create and I enjoy creating things for other people that I know truly appreciate the love that goes in to creating the pieces and they appreciate the Art, the colors, textures, etc. Swaps are posted in the Facebook groups and you can decide to join or not. They always have wonderful themes and ideas of awesome things to create, I like joining swaps where the theme or style is out of my comfort zone, it pushes me to extend my creativity and see what all I can make with my hands and my imagination. There are a ton of Facebook groups that do Art Swaps and im sure if you decide to join in a swap you will have lots of fun.
I will now post a link to my YouTube video where I show off the Beautiful Creations that were sent to me.
https://youtu.be/K6EToSQEe20
Subscribe to:
Posts (Atom)