Saturday, November 28, 2015

My letter is: S

Congratulations Ang!!!

A fellow crafter and design team member for The OddBallArtCo. just gave birth to a baby boy!
His name is Logan and to celebrate this joyous moment, the members of The OddBallArtCo. Design Team have come together to create pieces in his honor using an image that the very talented Lizzy Love designed for this event.

Below are the instructions and steps I have taken to create a card using the image.

First I colored the adorable image using various colored pencils, in the image below, it shows the colors as Blue and Grey, I colored the image in a couple of different color combinations to see which ones I liked the best, in the remaining photos you will notice I went with the Green and Yellow!
 Next, I cut out the image just using a pair of scissors, I cut around the image roughly leaving a bit of a white border around all the cute animals hanging on the line, I cut out Logan's name in the cloud as well but left the sentiment for another technique.
 I cut out the Sentiment using my Cuddlebug and a Die from Darice Essentials, using the third from the smallest size to cut it out!


I then chose a couple of various pieces of Cardstock, included is a Green Cardstock as my base, a Shiny Yellow and then another Green Cardstock with Glittered Alphabet Letters!
I then added Pop Dots to the back of the Sentiment, so when I add it to my card it will have some Dimension and stick out from the other images.
 Next, I adhered all of the images together and added the cloud image with the name Logan, and then I chose several Green Sequins and added them to the card with Tacky Glue.
 This is the final result of my card that I created for Crafting Ang and this wonderful Event.


Thank you so much for stopping by my blog, You can follow this link to Lizzy Love's Etsy store where you will be able to purchase this Adorable Image for Yourself!!
https://www.etsy.com/listing/258213735/instant-download-includes-sentiments

You can now go on to the next blog in this Hop to see what the next person has created for this event.
Here is the link to Monikas blog: https://l.facebook.com/l.php?u=http%3A%2F%2Fthecraftofmimi.blogspot.co.uk%2F&h=PAQGn7baH

Monday, September 14, 2015

Guess What??
I am one of the newest member of the Design Team for 
Oddball Art Co.

For my first project I chose to use Image No. 216 Richelle!! I loved the image and the sentiments that
were included with her!!
I decided to Alter a 5" X 7" Canvas focusing on the Big Eyed Beauty!

The steps I took to create this Beautiful Project was:

First I Printed off the Image from OddballArtCo. on Etsy,https://www.etsy.com/uk/shop/OddballArtCo
 then I used an Exacto Knife to cut out this Gorgeous detailed image!

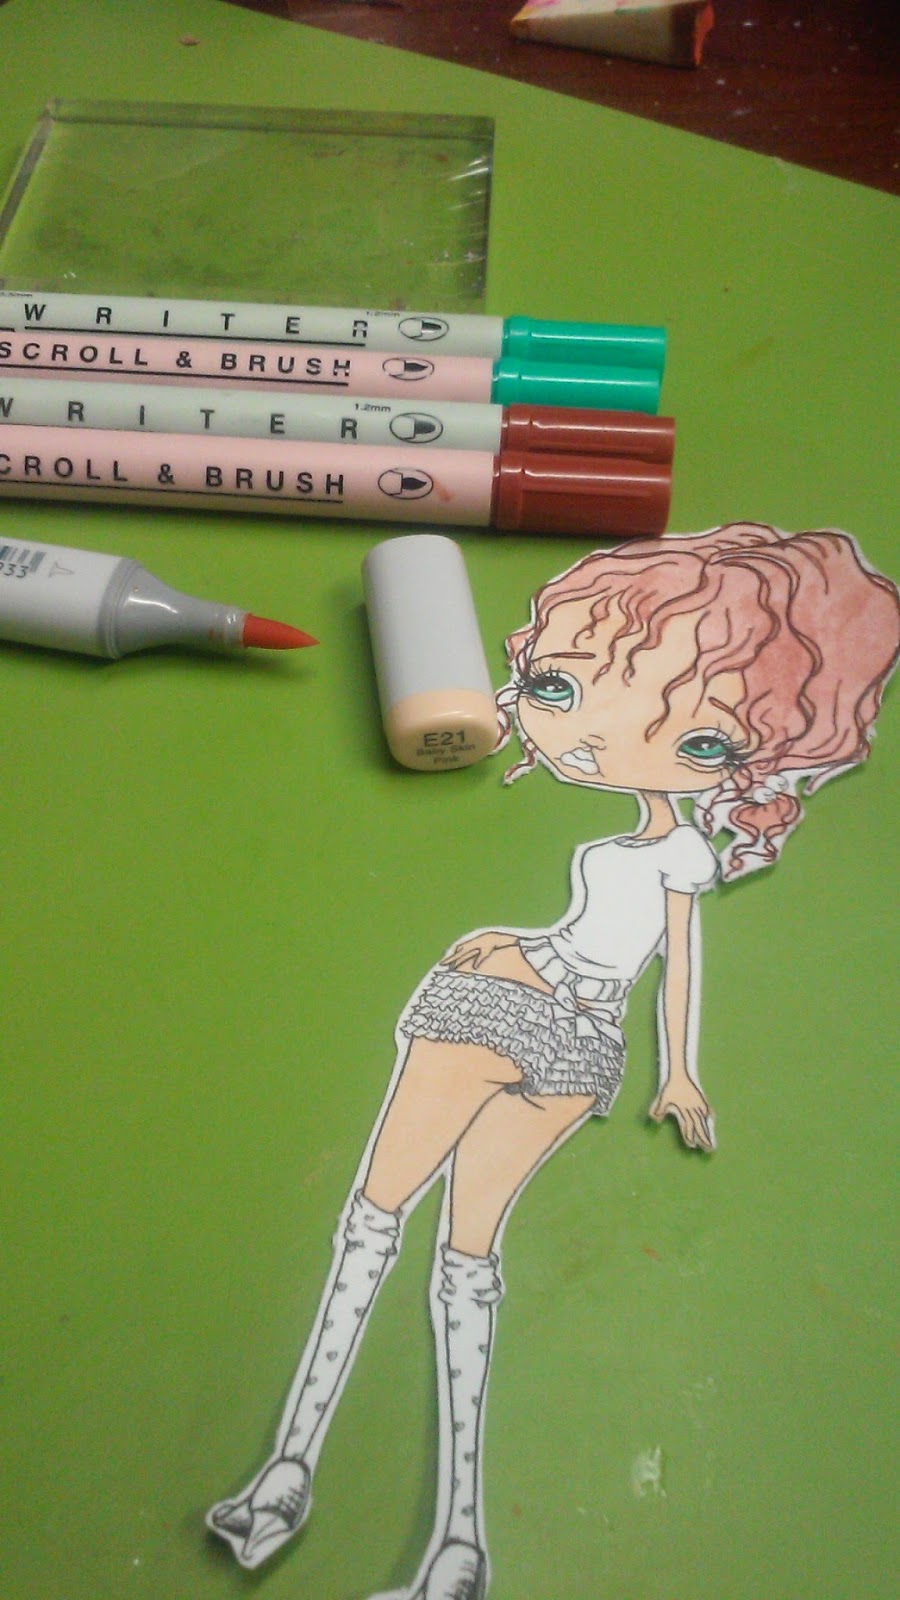
Second I used my Zig Markers to color in my image. I wanted to achieve the look of Watercolor or the look that people are able to get when they are using Copic Markers. I do not currently own Copic Markers so the steps I take to achieve that look are:


I use the Zig Marker that has the tips for "Writer" the smaller tip, I outline the outer part of the image I am wanting to color along with any lines that are distinguishing the image, so first I used the Brown to outline her hair and all the details inside to showcase the strands, then using a Clear Stamping Block I take the marker with the "Brush and Scroll" tips and using the Brush tip I scribble a little ink onto the Stamping Block, add a small amount of water and then using a small tip Paint Brush I dip my brush into the water and the ink and then I paint in the image of her hair. It has created a Beautiful look! This technique is my favorite way to color images. I used the Teal colored marker to fill in her eyes! I used my one and only Copic Marker which is the E21 Baby Skin Pink to color her skin!

I used the same technique to finish coloring in my image, using the colors Pink and Yellow!
Including one of the sentiments that came with the image that reads:
"dear self today i feel Beautiful"

The Third Step I took was to paint a 5" X 7" pre-gessoed canvas using the color "Pink Eraser" by Apple Barrel!

I then used a Stencil from the Tim Holtz Collection called "Rays"-THS003 and the paint color "Bright Yellow" by Apple Barrel and a Stippling Brush to add some color and texture to the background.

I wanted even more texture on the background so I used another stencil from the Tim Holtz Collection and some High Density Modeling Paste from Studio Acrylics and applied the paste with a palette knife!

After I added the paste I decided I wanted to change the color of the Modeling Paste, I wish I had come to this decision before I applied the paste (it would have saved me some time) if I had just added the paint to the Modeling Paste before adding it to the Canvas, but I didn't so my next step was to take the color "Turquoise" from Apple Barrel and fine tip paintbrush to color in all the "dots" I had created with the paste!

After my background was complete and dry I added my image with pieces of Foam to have the image pop away from the page, focusing on Richelle and the Sentiment!

I then took some White Flowers I had that came from a Lei I had purchased at Dollar Tree and using the "Turquoise and Bright Yellow Paint" that I had used on the background I painted the flowers so they would match. I painted Four of them so I could stack them onto one another creating a Beautiful Flower Piece in the top corner of the canvas!

I wanted to have a center for my flower so I took a Pink Resin Heart I had in my stash and used the "Pink Eraser" paint that I had used on my background and painted the Heart to match my canvas as well!

I added the Flowers and the Heart to complete my Canvas!!


I am so very Happy and Excited to be a part of the Oddball Art  Co. Design Team and I hope you will check back with me often to see the projects I produce using the Beautiful Images that are created by Lizzy Love! 
If you use the code DTLOLA10 at checkout you will receive 10% off of your purchase at OddballArtCo.
https://www.etsy.com/uk/shop/OddballArtCo

I hope you will stop by my YouTube Channel as well to see this process on Video, as well as other projects I have completed in the past! 

https://www.youtube.com/channel/UCHHUgyXLx5T1H5qq1V8fLxA


Saturday, May 16, 2015

Positive Affirmations!!

Hello Lovelies!!
Today I wanted to share a Postcard that I created with the theme "Positive Affirmations" for one of my crafty friends, Kendra O. This swap takes place on Jenniebellie's Website, You can find it here:
http://journalworkshops.ning.com/
This was the first swap I joined from this Website and the group of followers but luckily I did get partnered to Kendra, whom I have swapped with before on a different Art Group. I was really excited to create something that was so true and positive and so I choose the affirmation "Happiness is an Inside Job", to me that is something people should try to remember everyday! I want to remember everyday!
I wasn't sure what I was doing when I started making this postcard but I knew I wanted to write the Affirmation in my own handwriting, which I completed! Check out my video to see the outcome and the process I went through to get there!

http://youtu.be/COe7Kh3sI68

Tuesday, May 12, 2015

Black and Purple Pocket Letter!!

Hey there Lovelies!!
I was approached by a Crafty Friend who wanted to do a Private Pocket Letter Swap, I got really excited because that meant someone WANTED my art and it wasn't just a random swap partner! EEKKK!
So i found out her favorites and she liked Black, White and Deep Purple! I was immediately inspired and knew I wanted my background strickly Black and White with Purple accents! I went straight to work on it and put my heart into it! My Friend has received her Pocket Letter and she has expressed that she loved it, so now I will share it with all of you!! Enjoy!!


Saturday, May 9, 2015

Happy Mail!!

Hey Lovelies!!

I have received some Happy Mail that I shared on my YouTube Channel, if you dont know what Happy Mail is, it is mail that we receive from other people, usually containing works of art created by the other person, a few scraps of pretty papers for us to use in our own creations or anything artsy/craftsy! Alot of crafters decorate the outsides of the envelopes/packages and in turn we are all geniuinely Happy to receive this mail! The Happy Mail I show in my video is from some Swaps I have joined over the last few weeks and these were the pieces that people created for me.

I love doing these swaps, they are alot of fun, they inspire me to create and I enjoy creating things for other people that I know truly appreciate the love that goes in to creating the pieces and they appreciate the Art, the colors, textures, etc. Swaps are posted in the Facebook groups and you can decide to join or not. They always have wonderful themes and ideas of awesome things to create, I like joining swaps where the theme or style is out of my comfort zone, it pushes me to extend my creativity and see what all I can make with my hands and my imagination. There are a ton of Facebook groups that do Art Swaps and im sure if you decide to join in a swap you will have lots of fun.

I will now post a link to my YouTube video where I show off the Beautiful Creations that were sent to me.

https://youtu.be/K6EToSQEe20

Art Journal Page -Oddball Art Co. Image

Hey There Lovelies!!

So I am playing catch up today and wanted to share with you an Art Journal Page I created using an image from OddballArtco. designer is Lizzy Love. I absolutely love all of Lizzy's work, she is so talented and her images are so darn cute!!

I purchased the image from Lizzy's Etsy Shop (https://www.etsy.com/uk/shop/OddballArtCo?ref=related-shop-1&ga_search_query=Oddballart+&ga_search_type=all&ga_view_type=gallery)

I will post a couple of Pictures and the Link to the video below!


Link to my YouTube Process video!! Please Enjoy!!
https://youtu.be/egcBHdm31W0

Pink and Gold Pocket Letter!!

Hey There Lovelies!!
Sooooo....its been awhile! I have been uploading more videos to my YouTube Channel and I thought I would share today a video I uploaded a few days ago.
I was scrolling through my NewsFeed when I saw one of my Crafty Lady Friends post about wanting to do a Pocket Letter Swap with her and her 8 year old daughter. I really wanted to swap with this woman and I thought to myself that my 7 year old daughter would have alot of fun as well. So I replied and we set up our swap.
We discussed our colors and the colors and things our daughters loved and then we all began creating. My daughter and I received ours first, I had already finished making mine but my daughter did struggle just a bit since it was her first Pocket Letter. After we received ours though, my daughter gained inspiration to be able to complete hers so we could send them off.
The swaps are complete and I thought I would share with you the Pocket Letter that I created for my friend. Our colors were Mint Green, Pink and Gold, after starting my Pocket Letter I realized I didn't have any Mint Green colors so I switched to Teal but I knew my friend would still enjoy it! So without any further ado I present to you my Pocket Letter!

I loved the way it turned out and I really hope my Crafty Friend loves it too! Down below I am adding a link to my YouTube video where I show the steps I took to create this Page!

https://youtu.be/g0Eixfyhoxg


Saturday, April 11, 2015

GIVEAWAY TIME!!!!

Hello Lovelies,
 It's Giveaway Time! I decided to do a Giveaway on my YouTube Channel,
https://www.youtube.com/channel/UCHHUgyXLx5T1H5qq1V8fLxA 
I have decided to Giveaway my Mixed Media Pocket Letter that I had created. It was my first Mixed Media Pocket Letter and I had a lot of fun creating it, you can view the videos on how it was created below:
https://www.youtube.com/watch?v=OD7b_beZY_g
https://www.youtube.com/watch?v=ns2DrHHpdxQ

Rules and Regulations:
1.) Must be a Subscriber (Newbies are Welcome)
2.) Must be 18 or Older!!
3.) Open to US and International
4.) Like the video and Comment on the video to be entered!!

I will be drawing the names out of a Hat or a Bowl on 04/24/15!!
Good Luck!!

I really hope you will go check out my YouTube channel and Like and Subscribe to stay up to date with all the things I create! Have a blessed night!
                                                                              Lora
                                                                            

Friday, April 10, 2015

So...about those Ambitions??

Hello Lovelies,
So obviously you are learning quickly that I am one of those people that are sometimes scatter-brained and therefore eagerly commit to those things and within the same day completely drop the enthusiasm for the Project altogether for a couple days, weeks or unfortunetly months! I do hope I can be forgiven and that you will continue to follow along with me on my Journey.

Now I may have not been keeping up on my Blog but I have been getting some things created and I have added a couple of videos since my last blog post. For Starters, I want to tell you about my experiment, I absolutely Love all of the Products by Tim Holtz and I wish I could own as many products as possible from Tim but if you are familiar with Tim Holtz then you understand the dilemma, his products are pricey!

So I know there are videos all around YouTube showing people use their own but I didn't come across a Process Video for this Magnificent DIY so I decided to create one for your enjoyment!!
You can Click Below to access my YouTube video on How to Create your own Stamped Tissue Paper!!

https://www.youtube.com/watch?v=GKXcPJcbhTY


I had some tissue paper folded up in a box, left over from a Birthday Present, I had some white and some yellow. I looked through my wooden stamps and picked out various stamps with the same kind of theme! I laid out the tissue paper and then stamped the images all over using my Memento Ink Pad "Tuxedo Black".

I will be posting in the future about how I put the tissue paper to use!

 Thanks for Sticking Around to the end,
                                                                                Lora

Monday, March 9, 2015

Hey There!!

Hello Lovlies!!
How is everyone doing on this Monday morning? It is actually a rainy dreary March day for me here in Oklahoma, the hubs just called to let me know he is being sent home from work today due to the weather, he works road construction by the way.

        I woke up this morning with the desire to kick start my goals and ambitions towards creating a career for myself through my talents and passions. I have always desired a career that I loved and I always knew it was going to involve writing and art in some way. I discovered my passion of Art even more so a couple of years ago, I came across a YouTube video one day by LuvLeeScrappin and the video I saw was where she created a Beautiful handmade Butterfly out of Skeleton Leaves, Feathers and Hot Glue. It was Amazing, after that I binge watched her channel. Which then led me to all different kinds of videos and forms of Art and ways to express myself. I of course became addicted to YouTube and now I create my own videos! I, in no way think that I am a great skilled Artist because I consider myself still a Novice but I do enjoy creating the videos and sharing the things that I do know. I didn't realize how much help I could be to people because I think I don't really know very much but one day I was talking to my cousin, who is an Artist, better than me by far, but she has always just used basics, Paper, Pens, Markers, Paint. but she hadn't delved into the products and techniques that I have come across on my learning journey so when I mentioned something about Gesso (a thick white paint) she had no idea what I was talking about so that made me realize that their are people out there who don't know about it or maybe they are really great artists but they kick it old school or just haven't been to school just naturally draw or paint for hobby! I wanted to make videos but I grow more passionate about it when I realize that I can also maybe make a difference in someone's life or at least in the knowledge they possess over a certain subject, either way it makes me happy!

   With that being said I am going to leave a link to my most recent videos where I created my own Handmade Sprays and a review of the bottles I purchased from Walmart.com.

                       http://youtu.be/j3tKEawjE6s

I bought two packages of bottles they were around $8.00 for 12...so it was a good deal. The first few I made I filled the bottle about halfway full and then dropped about 7 or 8 drops of Food Coloring in and then replaced the lid and shook it up. It sprayed pretty good, the colors look great! I tried adding some shimmering eye shadow to make a glimmer mist like the Heidi Swapp Color Shine but it only clogged in the nozzle of the spray bottle. After I used all my colors of Food Coloring, I moved on to mixing Acrylics with water. The colors look amazing in the bottle but this is where my review for the bottles take a nosedive because after only a couple of sprays the caps get stuck and don't pop back up, to the point that on one of them I resulted to using pliers to get the spout to come back up. So the bottles were cheap and they are good if you are wanting to make sprays that give you a translucent look or transparent but for spraying Acrylic they get a thumbs down but I can still use the Acrylic sprays I made when I am wanting to achieve the Paint Splattered look, I can unscrew the cap and splat paint onto my pages and they are bright and thicker so you can really see the paint splatters on your pages.

   I hope you enjoyed the video, Please Like, Comment and Subscribe!! I also hope that you have enjoyed reading my first blog post! I am learning everyday and I hope you will join with me on this path of discovery!! Thank you and God Bless!!